Journal
Post-Procedure Skincare Routine: How to Build Your Recovery Regimen
Your bathroom counter is covered with products. Serums, toners, essences, actives, treatments, masks. Your normal skincare routine has evolved over years of experimentation...
February 28, 2026 / 9 min read

Your bathroom counter is covered with products. Serums, toners, essences, actives, treatments, masks. Your normal skincare routine has evolved over years of experimentation into a multi-step ritual that works beautifully for your skin. But you just had a procedure, and suddenly everything you know about skincare feels uncertain. Which products are safe? What order should you use them? Should you use anything at all?
Building a post-procedure skincare routine does not have to be complicated. In fact, simplicity is the goal. Your healing skin needs fewer products than your normal skin, but the products you choose matter significantly more. The right routine supports recovery, protects vulnerable tissue, and sets the stage for optimal results. The wrong approach can extend healing time, cause complications, or compromise your outcome.
This guide walks you through building an effective post-procedure skincare routine from the ground up, explaining each essential step and how your regimen should evolve as your skin moves through different recovery phases. For the complete science behind post-procedure recovery, see our in-depth post-procedure skincare guide.
Why Post-Procedure Skincare Is Fundamentally Different
Post-procedure skincare is not maintenance skincare with gentler products. It is a fundamentally different approach with different goals.
Your normal routine likely focuses on improvement: addressing concerns, preventing aging, optimizing appearance. Your recovery routine focuses on support: helping your skin heal efficiently, protecting vulnerable tissue, and avoiding anything that could interfere with repair.
However, recovery and anti-aging do not need to be separate goals. The post-procedure period presents a unique opportunity. Your skin is already in repair mode, producing new collagen and renewing cells. The right aftercare amplifies these processes rather than simply waiting for healing to complete. Ingredients like peptides, PDRN, NAD+, and plant exosomes support healing while simultaneously delivering rejuvenating effects through mechanisms that complement rather than stress the repair process.
This means stripping your routine down to essentials and choosing each product intentionally. Every product in your post-procedure routine should serve a clear purpose. If you cannot articulate why a product belongs in your recovery regimen, it probably does not.
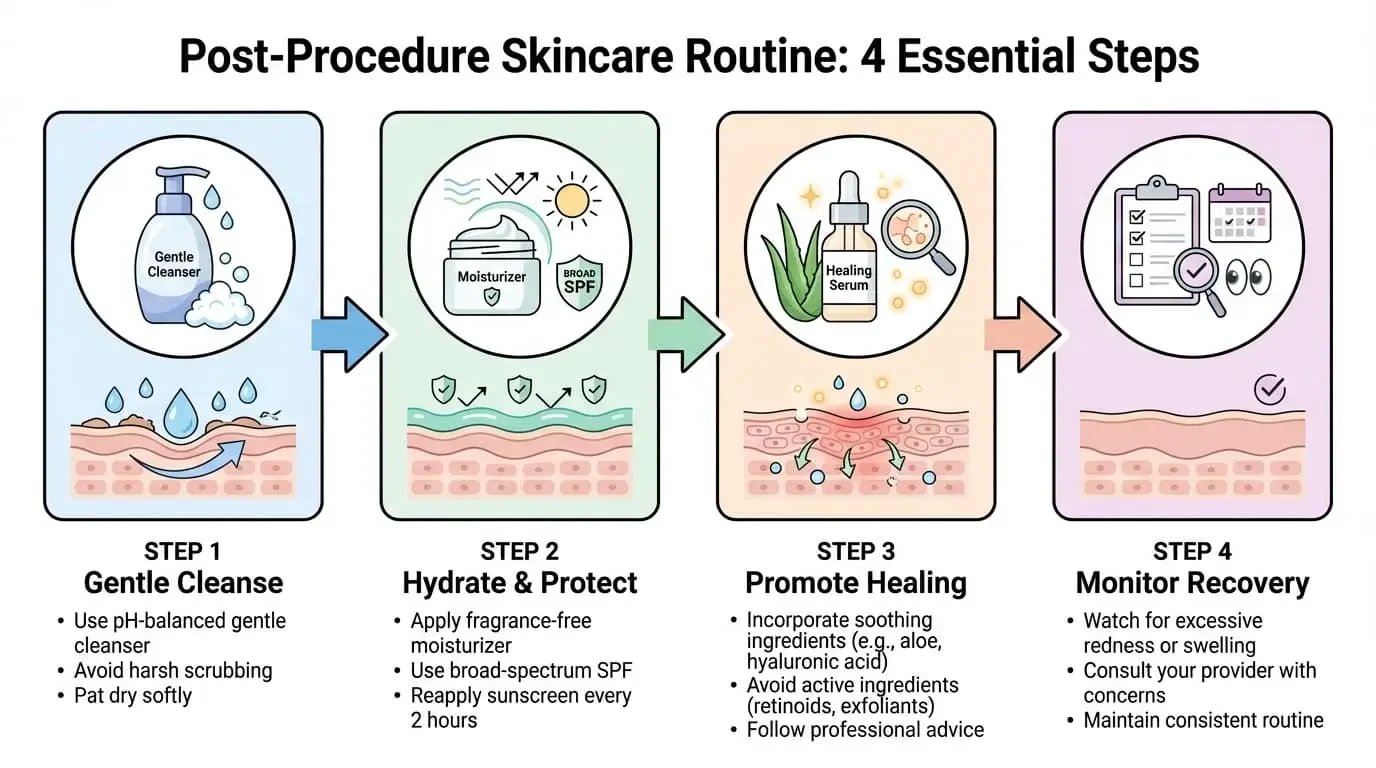
The Four Essential Steps of Your Recovery Routine
A complete post-procedure routine contains four steps. No more, no less during the acute recovery phase.
Step 1: Gentle Cleansing
Cleansing removes surface debris, excess oil, and product residue without compromising your healing barrier. This step prepares your skin to receive the products that follow.
Choose a non-foaming, fragrance-free cleanser with a pH close to your skin's natural level (around 5.5). Foaming cleansers contain surfactants that strip the lipids your barrier needs for repair. Apply with your fingertips using gentle, circular motions. Use lukewarm water, never hot. Pat dry with a clean, soft towel rather than rubbing.
Cleanse twice daily: morning and evening. If your skin feels tight after cleansing, your cleanser is too harsh.
Step 2: Active Recovery Support
This is the most important step. While cleansing, moisturizing, and sun protection provide basic maintenance, your active recovery product actually supports the healing process at the cellular level.
Your recovery serum should address the specific challenges post-procedure skin faces simultaneously: barrier compromise, elevated inflammation, increased transepidermal water loss, and intensive repair demands. These challenges happen at the same time and interact with each other. A single-ingredient product cannot address all of them. A formulation combining multiple complementary technologies provides the coordinated support your skin needs.
Apply your recovery serum to clean, slightly damp skin, allowing it to absorb fully before proceeding to the next step. This positions the active ingredients for optimal penetration.
Step 3: Hydration and Barrier Support
Moisturizer seals in the active ingredients you just applied and provides additional hydration to counter increased transepidermal water loss.
Choose a fragrance-free moisturizer appropriate for your skin type. Richer formulas provide more occlusion and may be preferred during early recovery when barrier compromise is most significant. Lighter formulas work well as healing progresses. Look for ingredients that actively support barrier repair: ceramides, fatty acids, niacinamide, and panthenol all contribute to barrier health beyond simple hydration.
Apply while your serum is still slightly damp to lock in hydration. Use gentle pressing motions rather than rubbing.
Step 4: Sun Protection (Morning Only)
Sun protection is non-negotiable. Your healing skin is extraordinarily vulnerable to UV damage, which can cause permanent hyperpigmentation and compromise your results.
Choose a broad-spectrum SPF 50 or higher. Physical sunscreens containing zinc oxide or titanium dioxide are often better tolerated by sensitive post-procedure skin than chemical formulations. Apply as the final step in your morning routine, after moisturizer has absorbed. Use adequate quantity and do not forget often-missed areas like hairline, ears, and neck if treated.
Your Morning Routine
- Step 1: Cleanse gently with lukewarm water and your non-foaming cleanser. Pat dry.
- Step 2: Apply your recovery serum to slightly damp skin. Allow absorption.
- Step 3: Apply fragrance-free moisturizer while serum is still slightly damp.
- Step 4: Apply broad-spectrum SPF 50 or higher. Reapply every two hours if outdoors.
- Total products: four. Total time: three to five minutes.
Your Evening Routine
- Step 1: Cleanse to remove sunscreen, environmental debris, and any makeup. You may double cleanse with a gentle oil-based cleanser followed by your regular gentle cleanser if needed for thorough sunscreen removal.
- Step 2: Apply your recovery serum to clean, slightly damp skin. Allow absorption.
- Step 3: Apply fragrance-free moisturizer. You may use a slightly richer formula at night.
No sunscreen needed at night. Total products: three (or four if double cleansing). Total time: three to five minutes.
How Your Routine Evolves Through Recovery Phases
Your routine should adapt as your skin moves through different stages of healing.
Days 1 Through 7: Maximum Support
Your skin is most vulnerable. Keep your routine exactly as outlined above with no additions. If skin feels particularly dry or tight, apply moisturizer more frequently throughout the day. Resist the temptation to add products. Focused support beats variety during acute recovery.
Days 8 Through 14: Active Healing
Your barrier is rebuilding and visible recovery is progressing. Continue with the same basic routine structure. You may begin observing whether your skin tolerates your normal moisturizer or whether you should continue with a simpler formula.
Do not reintroduce active ingredients yet. Even though your skin may look healed, barrier recovery is still ongoing beneath the surface.
Days 15 Through 30: Gradual Restoration
Continue your recovery serum once daily to support ongoing barrier health and anti-aging benefits. Begin gradually reintroducing products from your normal routine, one at a time, with several days between each addition. This allows you to identify any products that cause sensitivity.
Start with gentler products before progressing to actives. Retinol should be reintroduced last, and with the cautious, graduated approach described in our retinol reintroduction guide.
What to Exclude From Your Recovery Routine
Knowing what to leave out is as important as knowing what to include.
All active ingredients during the first two weeks: retinoids, AHAs, BHAs, vitamin C, benzoyl peroxide, and any exfoliating products. Fragranced products including those with essential oils. Toners and astringents, especially those containing alcohol. Treatment masks, peels, or any exfoliating treatments. Facial tools including cleansing brushes, gua sha stones, and microcurrent devices.
Your skin has already been exfoliated by your procedure. It does not need additional stimulation. It needs support.
Preparing Your Product Kit Before Your Procedure
Having everything ready before your appointment eliminates the stress of product shopping while your skin is healing.
You need four products: a gentle, non-foaming, fragrance-free cleanser (purchase early and test on intact skin to confirm it does not irritate); a multi-technology recovery serum formulated for post-procedure skin; a simple, fragrance-free moisturizer without active ingredients; and broad-spectrum SPF 50 or higher, ideally a physical sunscreen formula.
Having these ready means you begin proper aftercare immediately and consistently from the moment you get home.
Why One Recovery Product Replaces Your Entire Active Step
During your normal routine, you may layer a vitamin C serum, a peptide treatment, a retinol, and a hydrating serum. During recovery, you need all of those functions served by a single product that is safe for compromised skin.
This is why multi-technology formulations exist for post-procedure care. Rather than layering five products and hoping they are all safe for healing skin, a purpose-built recovery serum combines the technologies your skin needs in a single, tested, safe formulation.
Nexovia Skin Serum was designed on this principle. The ABA.4 Bio-Intelligent Architecture combines plant exosomes at 4 billion particles per milliliter for cellular communication and inflammation modulation, PDRN at 1% for tissue regeneration, NAD+ at 1% for cellular energy and DNA repair, and a peptide matrix with EGF-mimetics and matrikines for structural rebuilding. Each technology serves a distinct function. Together, they address the full spectrum of post-procedure recovery and anti-aging needs in a single application step.
Made in South Korea with the formulation science and manufacturing standards that Korean post-procedure skincare is known for, Nexovia simplifies your recovery routine to four products and five minutes while delivering more comprehensive support than a ten-step protocol could.
Frequently Asked Questions
How many products do I really need for post-procedure recovery?
Four products are sufficient for a complete post-procedure routine: gentle cleanser, recovery serum, moisturizer, and SPF. This minimal approach reduces irritation risk while providing everything your healing skin needs, including anti-aging support through the recovery serum. Resist the urge to add more during the first two weeks.
Can I use my normal cleanser after a procedure?
Evaluate your normal cleanser honestly. If it foams, contains fragrance, or leaves your skin feeling tight, it is too harsh for post-procedure use. Choose a gentler alternative for recovery. You can return to your normal cleanser once healing completes.
When can I start adding my other products back?
Begin reintroducing products after day fourteen, one at a time, with several days between each addition. Start with gentler products and progress to actives like retinol last. If any product causes irritation, discontinue it and wait before trying again. Our retinol reintroduction guidecovers exact timelines by pr ocedure type.
What if my practitioner gave me different products?
Always follow your practitioner's specific instructions. They know your treatment details and may have particular reasons for their recommendations. If you want to incorporate a multi-technology recovery serum into your routine, discuss this with your practitioner to ensure it aligns with their aftercare protocol.
This content is for informational purposes only and does not constitute medical advice. Always follow the specific aftercare instructions provided by your practitioner, as recommendations may vary based on your individual treatment and skin type.


