Journal
Laser Skin Resurfacing Aftercare: How to Heal Faster and Protect Your Results
You made a significant investment in laser skin resurfacing to address years of sun damage, fine lines, or uneven texture. The procedure itself took less than an hour, but now...
March 7, 2026 / 9 min read

You made a significant investment in laser skin resurfacing to address years of sun damage, fine lines, or uneven texture. The procedure itself took less than an hour, but now comes the part that will truly determine your outcome: the recovery period. What you do in the days and weeks following treatment directly influences how quickly you heal, how comfortable you feel during the process, and ultimately how stunning your final results will be.
Laser skin resurfacing creates controlled thermal injury to trigger your skin's regenerative response. Unlike a simple facial or light treatment, laser resurfacing demands a structured aftercare approach. Cutting corners or using inappropriate products can lead to complications, prolonged downtime, or compromised results.
This guide covers everything you need to know about laser skin resurfacing aftercare specifically. For a broader overview covering all laser treatment types including IPL and non-ablative options, see our complete laser treatment aftercare guide.
What Happens to Your Skin During Laser Resurfacing
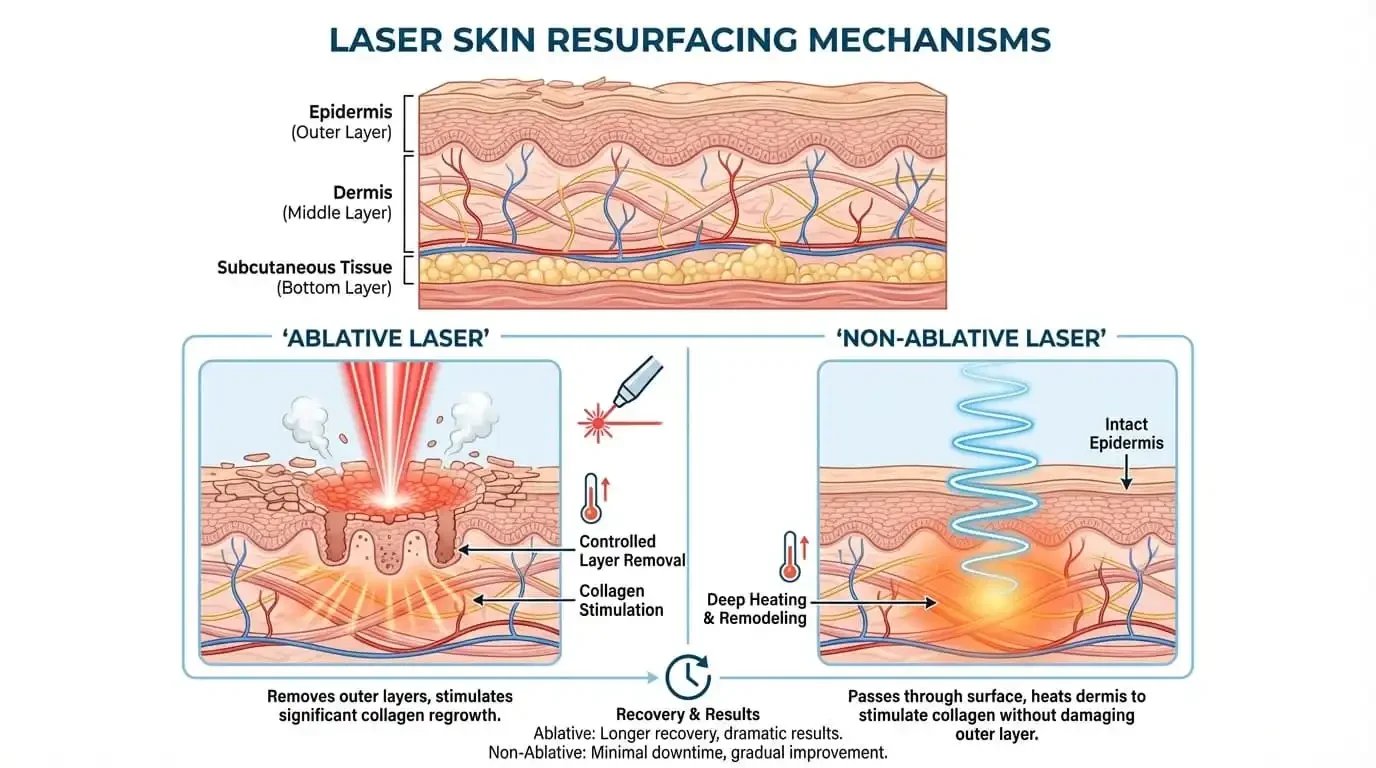
Laser skin resurfacing works by delivering concentrated light energy that removes damaged outer skin layers and heats the underlying dermis. This controlled damage triggers a powerful wound healing response that ultimately produces new, healthier skin with improved texture, tone, and firmness.
The intensity of this process depends on whether you received ablative or non-ablative treatment. Ablative lasers like CO2 and Erbium remove the outer skin layers entirely, creating an open wound that must heal from beneath. Non-ablative lasers work by heating the dermis without removing surface skin, resulting in less dramatic visible recovery but still requiring careful aftercare.
Regardless of the specific laser used, your skin faces several challenges during recovery. The protective barrier is significantly compromised, leaving skin vulnerable to infection, irritation, and environmental damage. Transepidermal water loss increases dramatically, causing dehydration and tightness. Inflammation is elevated as part of the healing cascade. New, delicate skin is forming and needs protection from UV exposure that could cause permanent hyperpigmentation.
Laser Skin Resurfacing Recovery Timeline
Recovery experiences vary based on laser type, treatment intensity, and individual healing capacity. The following timeline represents typical patterns, though your practitioner may provide specific guidance tailored to your treatment.
Days 1 Through 3: Acute Healing Phase
The first few days are the most intensive part of recovery. Your skin will appear red, swollen, and may feel like a significant sunburn. With ablative treatments, you may notice oozing or weeping as your skin begins forming new tissue. This is normal and indicates healthy healing.
During this phase, your primary goals are keeping the skin clean, preventing infection, and maintaining moisture. Many practitioners recommend gentle cleansing with saline or diluted vinegar solution several times daily, followed immediately by application of healing products. Your skin should never be allowed to dry out or form hard crusts, as this can lead to scarring.
Days 4 Through 7: Active Regeneration
Swelling begins subsiding and new skin starts emerging beneath any remaining damaged tissue. You may notice peeling or flaking as the old, treated layers shed. The temptation to pick or pull at this peeling skin is strong, but resist it completely. Premature removal of peeling skin can cause scarring and pigmentation issues.
Redness remains significant during this phase but should be gradually improving. New skin is extremely delicate and sensitive, requiring continued gentle care and protection.
Days 8 Through 14: Continued Recovery
Most surface healing completes during this phase for non-ablative treatments and lighter ablative procedures. Deeper ablative treatments may still show visible healing. Redness transitions from intense to a pink tone that is easier to cover with mineral makeup if desired.
Your new skin remains sensitive and vulnerable to sun damage. Strict sun protection continues to be critical. You may begin cautiously reintroducing gentle products as your practitioner advises.
Weeks 3 Through 8: Maturation Phase
Visible recovery is largely complete, but your skin continues maturing beneath the surface. Redness may persist as a subtle pink undertone for several weeks, particularly with more intensive treatments. Collagen remodeling continues for months, progressively improving skin firmness and texture.
Essential Aftercare Strategies for Faster Healing
Supporting your skin through each recovery phase accelerates healing and protects your results.
Keep Skin Consistently Hydrated
Dehydration is one of the biggest threats to healing skin. With your barrier compromised, moisture escapes rapidly, leaving skin tight, uncomfortable, and prone to cracking. Apply hydrating products frequently throughout the day, never allowing your skin to feel dry.
Look for products containing hyaluronic acid to draw moisture into the skin and occlusive ingredients to prevent evaporation. Your skin may need product application every few hours during the acute phase, decreasing in frequency as your barrier rebuilds.
Support Cellular Repair and Regeneration
Your skin is working overtime to produce new tissue and repair damage. Providing ingredients that support this intensive cellular activity can meaningfully accelerate the process.
Plant exosomes help modulate inflammation and support intercellular communication, allowing your skin cells to coordinate their repair efforts efficiently. PDRN activates signaling pathways that promote tissue regeneration and wound healing. NAD+ fuels the cellular energy production required for intensive repair work. Peptides and growth factors signal fibroblasts to produce collagen and rebuild the skin matrix.
These technologies work synergistically to address the multiple challenges of post-laser recovery, which is why multi-technology formulations outperform single-ingredient products for aftercare. For a full breakdown of which ingredients support healing and which to avoid, see our guide on what to put on your face after microneedling, as the ingredient principles apply across all post-procedure recovery.
Protect Against Infection
Open or compromised skin is vulnerable to bacterial infection. Follow your practitioner's cleansing protocol carefully, typically involving gentle washing several times daily. Keep your hands away from your face except when cleansing or applying products. Use clean applicators rather than fingers when possible. Change pillowcases frequently and avoid touching your face to phones or other potentially contaminated surfaces.
Avoid Sun Exposure Completely
New skin lacks the protective melanin of mature skin, making it extremely vulnerable to UV damage. Sun exposure during recovery can cause permanent hyperpigmentation that is difficult or impossible to correct. Stay out of direct sunlight entirely during the acute healing phase. Once your practitioner approves, apply broad-spectrum SPF 50 or higher religiously, reapplying every two hours when outdoors. Continue strict sun protection for at least three months after treatment.
Be Patient With Active Ingredients
Your regular skincare routine likely includes active ingredients like retinoids, vitamin C, or exfoliating acids. These must be completely avoided during recovery because they are too harsh for healing skin and can cause significant irritation or damage. Wait until your practitioner specifically approves before reintroducing any active ingredients, typically no sooner than two to four weeks depending on your treatment intensity.
Common Mistakes That Compromise Laser Resurfacing Results
Avoiding these frequent aftercare errors protects your investment and your skin.
Allowing skin to dry out or crust over can lead to scarring. Keep skin consistently moist throughout the acute phase. Picking at peeling skin causes damage to the delicate new tissue beneath and can result in permanent scarring or pigmentation irregularities. Using active ingredients too soon overwhelms healing skin and can cause irritation, prolonged redness, or other complications. Sun exposure without protection can cause permanent hyperpigmentation that may be impossible to reverse. Skipping aftercare products because skin looks healed ignores the ongoing repair happening beneath the surface.
Choosing Aftercare Formulated for Laser Recovery
Laser skin resurfacing creates intensive healing demands that generic skincare products are not designed to address. Your skin faces multiple simultaneous challenges: barrier compromise, inflammation, dehydration, and the need for rapid tissue regeneration. A single-ingredient product can only address one or two of these needs at a time.
The most effective approach is a formulation that combines complementary technologies designed to work together on compromised skin. Look for products that include calming ingredients to manage inflammation, barrier-supporting actives to reduce water loss, tissue repair signals like peptides and growth factors, and cellular energy support to fuel the intensive healing process.
Products specifically formulated for post-procedure recovery are tested for compatibility with compromised skin and eliminate the guesswork of layering multiple products during a time when your barrier cannot tolerate unnecessary complexity.
Not sure which aftercare approach is right for your laser treatment?
Frequently Asked Questions
How long does redness last after laser skin resurfacing?
Redness duration depends on treatment intensity. Non-ablative treatments may show redness for one to two weeks. Lighter ablative treatments typically cause redness lasting two to four weeks. More intensive ablative resurfacing can result in redness or pinkness persisting for two to three months, though this gradually fades and becomes easier to cover with makeup after the first week or two.
When can I wear makeup after laser resurfacing?
Most practitioners recommend waiting until surface healing is complete before applying makeup, typically seven to ten days for lighter treatments and up to two weeks for more intensive procedures. When you resume makeup, use mineral-based, fragrance-free formulas and clean applicators. Your practitioner will advise based on your specific treatment and healing progress. For more detail on safe makeup use during recovery, see our guide on wearing makeup after microneedling, as the same principles apply to laser treatments.
Can I exercise after laser skin resurfacing?
Avoid exercise that causes sweating for at least seven to ten days after treatment. Sweat can irritate healing skin and introduce bacteria. Heat and increased blood flow may also intensify swelling and redness. Light walking is generally acceptable after the first few days. Resume more vigorous exercise only when your practitioner approves.
What should I do if I notice signs of infection?
Contact your practitioner immediately if you notice increasing pain rather than decreasing, spreading redness beyond the treated area, pus or unusual discharge, fever, or any other concerning symptoms. Early intervention is important if infection develops.
How soon will I see results from laser resurfacing?
Initial improvement in skin texture is often visible once surface healing completes, typically within two to three weeks. However, the full benefits of collagen remodeling develop over three to six months as new collagen matures and organizes. Patience during this period is rewarded with progressively improving results.
What is the best serum to use after laser skin resurfacing?
The best post-laser serum addresses multiple recovery needs at once. Your healing skin needs hydration, inflammation control, barrier support, and tissue regeneration simultaneously. Nexovia Skin Serum was designed specifically for this purpose, combining plant exosomes, PDRN, NAD+, and a peptide matrix in its ABA.4 Bio-Intelligent Architecture to support every phase of post-procedure recovery.
This content is for informational purposes only and does not constitute medical advice. Always follow the specific aftercare instructions provided by your practitioner, as recommendations may vary based on your individual treatment and skin type.


